If your day job involves writing code that runs inside or underneath operating system kernels, you often find yourself wishing for a simple way of getting debug prints out. Years ago this was simple, about 12 lines of code would set up a serial port and and then mov dx,3f8H; out dx,al would make a character magically appear on the terminal.
Serial ports have long since gone the way of the stone axe, and their replacements aren’t really any good: AMT’s SOL is a pain to use, USB 2 and 3 debugging is miserable to set up, works about one in 20 times you want to use it and needs to be connected at boot, firewire’s disappeared as have all expresscard slots.
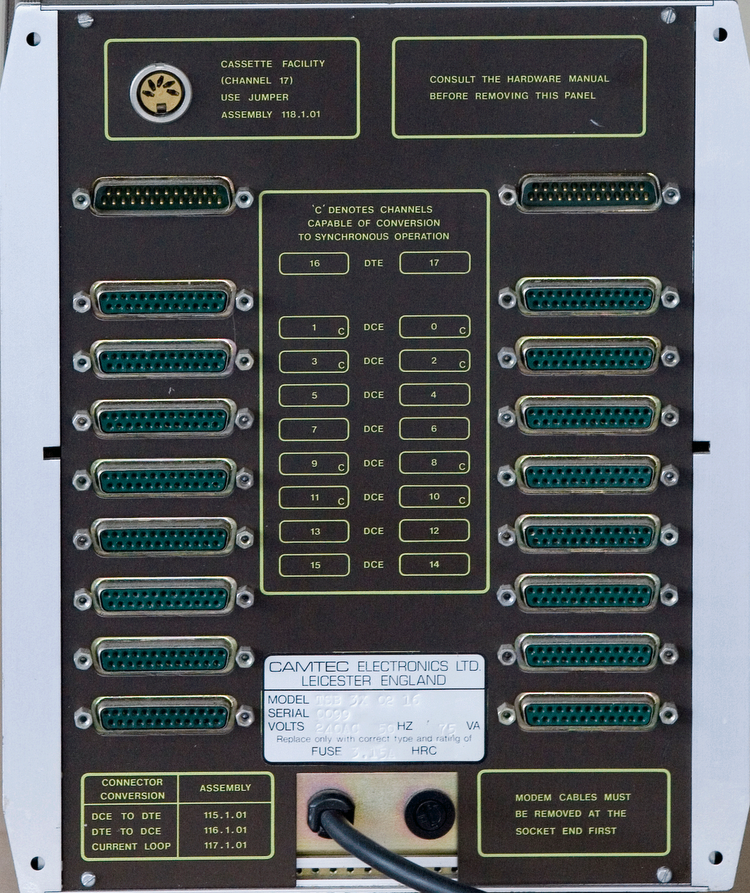 The JNT-PAD, England’s finest terminal concentrator.
Serial ports were good because you could usually persuade the rest of the OS stack to leave them alone, and they needed minimal configuration (they don’t even require functioning RAM) to work.
Frustrated by this, I came up with two new solutions to this problem, one which requires about $10 of hardware and is useful in the lab, and one the requires no hardware and is useful in the field, neither require anything other than IO port access and the CPU’s TSC to function (no DMA, no memory buffers &c.)
1) PSK using the PIT and the speaker:
You can get usable (1000 baud) simplex debug data using just the PC speaker. This is good as it doesn’t require any extra hardware except another PC or smart-phone to decode the squeaks.
The PC AT contained an intel 8254 programmable interval timer (PIT), it was used to generate a periodic ticker interrupt, refresh the DRAM, and generate the signal for the PC speaker. The (edited) schematic looked like this:


Today this is typically all integrated somewhere inside the south-bridge, but the logic is the same. With this arrangement the CPU can directly bit-bang the speaker using bit 1 of port B, or the 8254 can generate square waves.
There’s a long and proud history of transferring serial data over audio, from the old radioteletype systems of the 1930s, through the modems of the dial-up era to horrors like Silverpush’s Unique Audio Beacons. The two most commonly used modulation schemes are Frequency Shift Keying (FSK) and Phase Shift Keying (PSK). FSK is much simpler and lends itself to being generated by the 8254, but PSK is easier to decode in the presence of noise, and tends to work better over the sort of channels formed by laptop speakers and smart-phone microphones. (I got 100 baud with FSK in ideal conditions, vs. 1000 baud with PSK)

A 300 baud FSK modem with rubber cups to hold a telephone handset.
It turns out there’s a standard (ITU 60H0J2B) for simple binary PSK communication over audio channels and it’s still in use by radio amateurs today. A zero is encoded by reversing the phase, and a one is encoded by leaving the phase as it is. The transmission starts with a string of zeros, and ends with a string of ones, and there’s a fairly arbitrary mapping of characters to strings of ones and zeros.
I had a quick look to see if I could use the 8254 to do PSK. In theory it’s possible to reset the counter halfway through a cycle or to switch between the carrier frequency and double the carrier frequency, but neither of these two approaches seemed particularly reliable or portable, because, I think, a goodly number of the 8254 implementations don’t support the more outré modes.
By far the simplest thing to do is to use the 8254 to calibrate the CPU’s TSC and generate the carrier when the system is idle (keeping the squelch on the receiver happy). Then when the system wants to send data, the CPU can bit-bang the waveform through bit 1 of port B directly in a tight loop timed by the now calibrated TSC. One of the nice, but crazy, things about Linux is that a user-land processes can have have direct control of the interrupt flag and the ability to write to IO ports. So using that capability, here’s a quick demonstration of the system as a small Linux program, you’ll need to run it as root, and, obviously, since it steals a CPU from the system for the duration, you probably shouldn’t run it on something you care too much about. (If your OS has loaded a sound driver it’s possible that the 8254 output is muted in the mixer, Linux usually calls this channel something like Beep.)
Simple mixer control 'Beep',0

Capabilities: pvolume pvolume-joined pswitch pswitch-joined penum

Playback channels: Mono

Limits: Playback 0 - 15

Mono: Playback 13 [87%] [-6.00dB] [on]
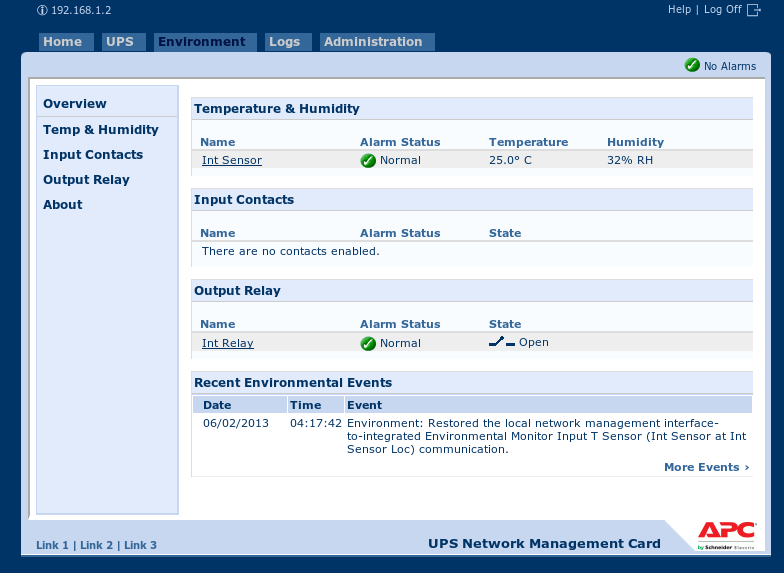
To receive the data you’re spoilt for choice, the applications I found most useful were fldigi on the desktop and, on android, tivar. Here’s a screenshot of tivar running:
 You’ll need to set the mode to match the modulation and baud rate (here BPSK and 125) and set the carrier frequency (Menu → Preferences → MODEM → Audio Frequency) to match F in the source (here 2200 Hz). Experimentally 1k baud works fine for a well-placed, good-quality microphone in a quiet room.
One of the interesting things about this approach is that you get to hear when SMM steals CPU cycles.
2) Full duplex serial over DisplayPort:

The vast majority of DisplayPort outputs are actually dual-mode (or DisplayPort++). With the appropriate magic they will generate DVI compatible signals, albeit at the wrong voltage levels. The DVI interface includes the I²C DDC bus, and it’s possible to attach an I²C UART like the SC16IS750 and, GPU permitting, then bit bang it from the CPU. Intel GPUs give you direct access to the DDC lines via some GPIO registers.
If you try this you’ll discover several problems: first it’s not obvious how you tell a DisplayPort++ port that you want it to be a DVI/HDMI port, second the firmware of modern GPUs (and indeed windows) will power down the port at almost every opportunity and third you’ll still need some way of getting the TTL data out of your UART at the end since not even desktops tend to have serial ports any longer.
The only reference I can find for switching dual-mode DisplayPort sources is the VESA DisplayPort Interoperability Guideline v1.1. It suggests that a source will detect an HDMI/DVI adapter by either testing if CONFIG1 is high, or by trying both DisplayPort aux transactions and I²C transactions and seeing which works. Empirically on the Intel chipsets I tried, I needed to pull CONFIG1 high.
Power saving, however, proved more complicated. After a bit of digging it turns out that the output power management and hotplug detection on recent Intel GPUs is done in the GPU’s firmware. I didn’t find any simple way to override it, so I did the next best thing and tricked it: adding a 24c02 to the bus, programmed with valid DDC data, and pulling the hot plug detect line high caused the GPU firmware, and both the EFI and the OS video drivers to keep the port powered.
Finally that leaves the third problem getting the data out (my desktop also no longer has a serial port). Rather than use a real 24C02 and SC16IS750, I decided to use a small STM32F103RBT6 board I had lying around to emulate them, it, in turn, presents a CDC-ACM USB serial port to the host that’s plugged into it.

The STM32F1 turns out to be an excellent choice: there’s hardware support for both USB and implementing exactly two I²C slaves. Programming the I²C hardware on the STM32F1 is always a bit exciting as the state machine can get stuck easily but the slave support seems much more robust. The only disappointment is that enabling the I²C hardware forces you to disable the pull-ups on the pins, necessitating a small board with external pull ups.

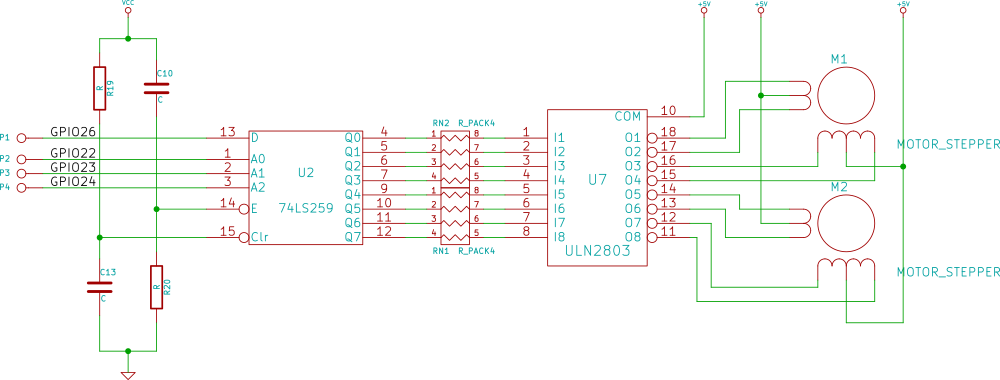
The wiring looks like this:
 Pin numbers on the left are for DisplayPort and mini DisplayPort connectors
The code to drive this stack is somewhat simpler than the BPSK modem above, as both the SC16IS750, and my STM32F1 emulation of it present the traditional NatSemi 16550 register set. To improve performance I added a new register to the STM32F1 emulation of the SC16IS750, which allows you to send an arbitrary number of bytes in one I²C transaction (the SC16IS750 increments the register address after every byte). The STM32F1 code is here (I added a small boot-loader that allows the firmware to be updated with dfu-util). I’ve added the pre-compiled hex files to the repository as I know that building the code on Debian is somewhat involved.
Demonstrating this from Linux user-land is challenging. Somewhere between 3.11 and 3.19, Linux made it impossible to map the Intel GPU MMIO bar in user-land. Fortunately Intel has a mechanism to allow their 16 bit video BIOS to access the MMIO bar using only IO port accesses. The code uses that mechanism. It should work on pretty much any recent-ish Intel GPU. One of the nice things about this approach is that if you know the bus number in advance, you can connect the adapter after the system has booted.
root@yoga3:~/sd# ./serial_over_dp
Found active IGFX I2C bus 3
Found active IGFX I2C bus 4
Serial port found on IGFX I2C bus 4
root@yoga3:~/sd#

Resources:
STM32F1 code: git://git.panaceas.org/stm32/serial_over_dp (note you’ll need to pull the submodule and compile it)
Linux user-land example code: git://git.panaceas.org/tools/serial_debugging (includes hex files of the STM32F1 code)
If making DisplayPort cables seems like no fun, you can get the I²C out with a series of adapters – there are plenty of people on Amazon and eBay selling HDMI screw terminal adapters like this one:
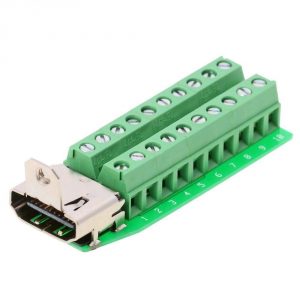 and then you can connect this to a “passive” (read cheap) DisplayPort to HDMI adapter cable. To finish you just have to make a few connexions at the screw terminals:
- A link from Pin 18 (DP_PWR) to Pin 19 (HPD) to indicate there’s a monitor
- A 10KΩ resistor form Pin 18 (DP_PWR) to Pin 15 (DDC CLK/SCL)
- A 10KΩ resistor from Pin 18 (DP_PWR) to Pin 16 (DDC DAT/SDA)
Then connect Pins 15 (SCL), 16 (SDA) and 17 (Ground) to PB6, PB7 and Ground on the STM32F1 board.


 l
l